Tuesday, 20 December 2016
Monday, 12 December 2016
Editing Music Video
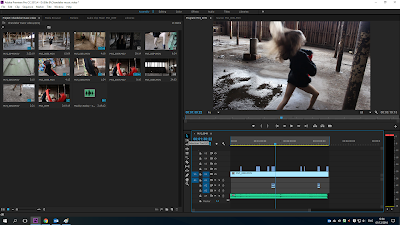
Before we started to edit, we imported all of the clips we had filmed in the abandoned building onto Adobe Premiere Pro. At this point we haven't filmed our 'clubbing' scene yet. Once all the clips were imported we watched through them all to see which clips we liked and which ones we didn't and started to begin the editing process.
Once we had looked through the clips and imported them all, we imported the song 'Chandelier by Madilyn Bailey' (cover) so we had it on the pc and Adobe Premiere Pro.

Firstly, we put the over 3 minutes worth of footage of our actor dancing to the song with a long shot because it made it easier for us to then put the other clips over the top where we thought it worked best. To help with putting clips in certain places we put the music on and matched it with the first clip so she's not dancing out of time. Some of the clips we edited on top of the video, for example, was a close up of the actors feet whilst she's performing a pirouette and then edit it back out to the long shot of her pirouetting because it gave a good effect and the audience will be able to see what dance move she's performing up close.
We decided not to change the contrast or lighting of the clips we've gotten because we felt as a group the natural lighting was enough and we liked how it looked.
Once we decided that we had finished the dancing section of the music video and placed the clips where we wanted, we then filmed our 'clubbing' scene and uploaded it to Abode Premiere Pro. We watched through the 6 clips we managed to film of Phoebe (the actor) and discussed what parts to take from them and which bits we didn't want, this made it easier for us to then know what clips to transfer onto the music video and find a place to put them.
The only editing we did on all of the 'clubbing' clips was cropping the bottom of clip because we wanted the effect of her looking naked but whilst filming she had a sleeveless top on so in the clips you could clearly see she had a top on, hence why we had to crop them. To do this we used the 'Crop' button under the 'Transform' tab, after clicking on these you go onto 'Effects Control' which comes up with the option of 'Scale' enabling you to zoom in or out on the clip; we zoomed inwards.
Again, we decided not to change the lighting or add an effect to these clips because we thought the colour lights were bright enough and liked how they contrasted with the black background.
For our final bit of filming we had the same actor in the same back ground (black back drop) but instead of disco lights we've used UV paints which represents the pain and hurt she's feeling. Like the other clips we downloaded them to the computer and transferred them to Adobe Premiere Pro and together we decided where they'd fit best; some related well to the lyrics.
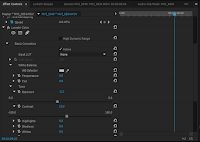
After uploading the clips, cropping them down and placing them in the appropriate place where they work best, we decided that you could see too much of the hand held light on our actors face so we wanted to turn the lighting down to make the UV paint look brighter and her face darker. We did this by clicking the clip we wanted, then on tab which is labelled 'Video Effects', then 'Colour Correction' and lastly 'Lumertri Colour', which we had to drag onto the clip and this enabled us to change the brightness to how we wanted. Too change the brightness we used 'Exposure' and 'Contrast' and fiddled around with both of the levels to get the perfect brightness for our music video.
After we changed the brightness on all of the UV paint clips, this made us want to also change the brightness on some of the disco light scenes to enhance all the different colours. This was done through the same process as before but instead of going onto 'Exposure' and 'Contrast' we went onto the 'Colour Wheels'. The colour wheel we used was 'Highlights' because we were wanting to highlight specific colours in scene, for example in this screen grab we highlighted the dark blue because this was the colour the disco light was at the time. The other people in the group and me were happy with the results of editing the clips and thought it made the music video more effective and stand out.
Thursday, 8 December 2016
Filming Notes
This will be taken with us to the set when we go to film because we can easily look down the list and ensure that we don't miss anything important out.
LIGHTING
- Disco light
EQUIPMENT
- Cameras
- Tripod
- Shoulder rig
SHOT LIST
- Tracking shot of the actor dancing around the set
- Long shot of the actor dancing
- Close ups
- Panning
HEALTH & SAFETY
- Warm clothing
- Broom to sweep away broken class
COSTUME
EMILY
- Black over-sized hoodie
- Skin coloured tights
- Black dance shorts
- All black shoes
PHOEBE
- Off the shoulder top to give the effect of her being 'naked'
PROPS
- Red cloth
Monday, 5 December 2016
Thursday, 1 December 2016
Permission Email
Permission Email
This is the email we sent to Madilyn Bailey asking for permission to use her song. We had to go onto her YouTube channel which provided us with the email address under the caption 'Business inquiries' and we used Sarah Weichels (sarah@sarahweichel.com). We didn't create an actual form for her to sign due to the distance of where each of us live; she lives in America and we live in the UK. This could be a disadvantage for us if she changes her mind because we don't have a proper signature from her saying we're allowed to use her song, so she has the chance to change her mind whenever she likes. The reason for us emailing for permission is to let them know that we're using their song for educational purposes and that's all because they have ownership over their songs.
Subscribe to:
Comments (Atom)


